 |


Welcome to StudioKnits.com©
Original knitting patterns, delivered instantly to your computer!
------------------------------------------------------
Online knitting book
»
Join news list
| Contact |
FAQ - About us
Home (Patterns)
How to Become an "Expert
Knitter"
*Buy this book
on CD for offline reading!
table of contents
» chapter
12 (of 29)
12: Pockets
Pockets are easy to knit, but it all starts to get a little more
complicated if you want them to look as if they are almost organic,
as if they have just grown easily on the garment.
Attention to detail becomes important when deciding where to place
the pocket, how to attach it and, if there is a lining, how to make
it invisible. A lining should be mysterious, it should never be
evident on the right side of the garment.
When using a knitting pattern, the directions for the pockets are
there for you. If you have knitted a garment of your own design, you
have decide what to do and how to make it look good. Either way,
there is an inbuilt helper. The rows and lines of stitches form a
grid, and that is a graph that you can easily follow. You don’t have
to measure, just count the stitches and rows.
Some pockets are knitted as a part of the garment, others are
knitted separately and attached afterwards. The positioning is
important.
Pockets are usually set near the side seam, or right on, or even
over, the side seam. They are placed above the hem band or at a
distance longer than the depth of the pocket from the hem. The top
of the pocket should be in a natural position in relation to where
your hands would be comfortable when you put them into the pocket.
Too high feels and looks wrong, too low only suits orangutans.
Sometimes pockets are a design feature on the top of the garment,
and these also have to be placed in a functional position. Make sure
that the pocket is a reasonable distance from the shoulder, and keep
in mind what will be under the pocket when you set the position.
Large breasted ladies need very carefully placed pockets so that no
extra size is added, and make sure that the pockets don’t land on an
unfortunate spot.
Keep pockets in good proportion. On a big garment, a tiny pocket can
look just plain silly.
If the pocket has been separately knitted or will be added by being
picked up and knitted on, mark out the shape and position of the
pocket with contrasting coloured threads or safety pins. Remember
when positioning the marking that a stitch on either side of the
pocket will disappear when the pocket is stitched in place. Marking
will help set the perfect spot, and clearly shows where to work the
seams to attach the pocket [pic 1].
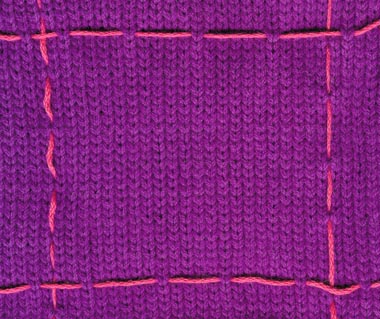
1: Mark the size and shape of the pocket exactly where it
will be placed.
Make sure that the position matches exactly if there are pockets
on each side of a garment. One row or stitch out of balance can show
up like a neon light.
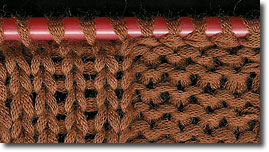
The base of a pocket should sit straight on a horizontal row, and
the easiest way to make sure of this is to pick up stitches along a
row of the garment in the position that you have chosen, and then
complete the pocket [pic 2].
2: Pick up stitches along a horizontal row for the start of a
patch pocket.
NEXT
PAGE >> chapter
page: 1 | 2 |
3 | 4 | 5 |
|